HDD looks simple on paper: drill a pilot bore, ream it, pull back conduit. In practice, results swing wildly based on ground conditions, tooling choices, drilling fluid mixtures, and how sharp your crew is at reading feedback mid-shot.
This guide walks through the full HDD installation process for fiber, what you need before drilling starts, the parameters that actually move the needle, and the mistakes that sink projects.
TL;DR
- HDD drills a pilot bore, reams it, and pulls back conduit with minimal disruption.
- Ideal for urban corridors, sensitive sites, and road, river, or rail crossings.
- Success depends on matching bits, reamers, and fluid to ground conditions.
- Requires utility locates, a properly sized rig, and trained operators before drilling.
How to Install Fiber Using Horizontal Directional Drilling
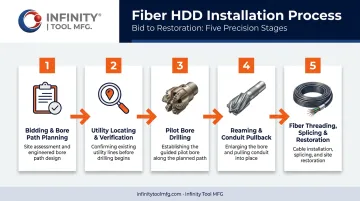
Installing fiber with HDD follows five distinct phases. Skip or rush any one of them, and you're looking at rework, damaged conduit, or a utility strike.
Step 1: Project Bidding and Bore Path Planning
Before quoting a job, assess the ground you'll be drilling through. Rock, clay, and sand each demand different tooling and drilling speeds, and getting this wrong at the bid stage leads to blown schedules later.
- Evaluate site type: residential, urban, or rural conditions determine bore length, allowable working hours, and how much restoration you'll owe afterward
- Call 811 for utility locates well ahead of mobilization
- Walk the entire bore path to flag obstacles both above and below ground, including fences, trees, drainage structures, and anything the locate ticket might have missed
Step 2: Utility Locating and Verification
This is the step contractors most often shortcut, and it's the costliest one to shortcut. A one-call mark tells you a utility exists nearby. It does not tell you the exact depth or position.
CGA's 2021 HDD damage analysis recorded 9,054 damages involving HDD equipment, with locating-practice issues identified as the leading root cause and telecom work responsible for 1,714 gas facility hits (CGA DIRT Report). Those numbers point to a systemic pattern in locating practices, not a handful of unlucky jobs.
Before drilling:
- Confirm every marked public utility line and reach out to property owners about unmarked private lines (irrigation, propane, private electric)
- Use dedicated locating equipment and vacuum excavation to pothole at every crossing point
- Document verified depths and positions in writing, not just on a locate map
Step 3: Pilot Bore Drilling
Rig selection comes first. Match rig capacity to bore length and ground type. A mini rig built for 600-foot residential shots won't hold up on a 1,000-foot midi-range crossing through mixed soil.
Bit selection matters just as much. In soft-to-medium ground, Infinity Tool MFG's PDC bits are engineered to maintain consistent performance and reduce chatter and torque fluctuation during the drive, which keeps steering accurate and cuts down on unplanned tool changes mid-bore.
Once drilling starts, the steering and tracking system (transmitter and locator) becomes your eyes underground. Watch it constantly. Deviation compounds the longer you go without correcting it.
Step 4: Reaming and Conduit Pullback
Not every bore needs a separate reaming pass. Whether you ream depends on your conduit or bundle size relative to the pilot hole, plus how stable the formation is.
When reaming is required, reamer geometry drives the outcome. Taper-and-spiral PDC reamers (the design Infinity Tool MFG builds into its reamer line) cut symmetrically around the hole rather than off-center, which reduces wobble and lets many bores go straight from pilot to finished size in a single pass.
During pullback itself:
- Attach the pulling head securely to the conduit or bundle
- Monitor pulling force continuously: conduit has a rated tensile limit, and exceeding it damages the jacket or the fiber inside
- Slow down through tight bends or areas where the pilot bore showed resistance
Step 5: Fiber Threading, Splicing, and Restoration
Once conduit is in the ground, you thread the fiber. Short shots typically use direct pulling; longer runs often favor air-blowing (jetting), which reduces friction and cable stress over distance.
Splicing comes next, and it's not a step to rush. Wear ANSI-rated eye protection at all times, contain glass shards from stripped fiber in a dedicated disposal container, and never look directly into a fiber strand until you've confirmed it's inactive.
Finish with restoration (backfill, sod, or concrete depending on the surface) and test the completed line end-to-end before calling the job done.
When Should You Use HDD for Fiber Installation?
HDD isn't automatically the right call for every job. The decision comes down to site conditions, project scale, and budget.
HDD makes the most sense for:
- Urban corridors where open trenching would tear up streets, sidewalks, and landscaping
- Environmentally sensitive areas where surface disturbance triggers permitting headaches
- Road, river, and rail crossings where trenching simply isn't an option
- FTTH builds that need minimal disruption to residential yards and driveways
HDD becomes less efficient when:
- The run is very short - mobilization costs can outweigh trenching savings
- The budget is tight and doesn't support specialized rock tooling
- Ground is heavily bouldered or full of unknown debris without a dual-rod machine and rock-rated bits like PDC or DTH hammers on hand
Project scale plays a role too. A few hundred feet of residential drop might not justify HDD's mobilization cost. Once you're into thousands of feet - especially with multiple crossings - the avoided restoration and reduced traffic disruption tend to win out.
The Distribution Contractors Association cites reduced property disturbance, shorter timelines, and less restoration work as HDD's core advantages over open-cut methods (DCA Trenchless overview). Actual cost savings still vary by project rather than following a fixed percentage.
What You Need Before Installing Fiber With HDD
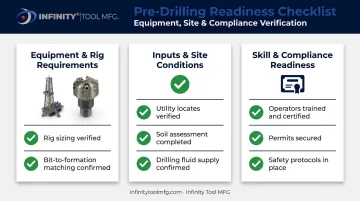
Preparation determines your bore success rate more than any single piece of equipment. Get these three categories locked down before mobilizing.
Equipment & Rig Requirements
- Match rig and drill string capacity to the planned bore length, diameter, and ground type—not just the biggest machine available
- Avoid undersizing for rocky ground, which stalls progress, and oversizing for short residential shots, which wastes money
- Match bit type to the formation, such as PDC bits for softer soil and DTH hammer bits for rock, to prevent excess wear and slower bores
Inputs & Site Conditions
- Verified utility locates with documented depths, not just marked paint
- An accurate soil and ground assessment (geotechnical data where available)
- Adequate drilling fluid supply on hand and mixed for the actual formation
Skill & Compliance Readiness
- Trained, certified operators who understand steering feedback
- All required permits secured before the rig arrives on site
- Safety protocols in place for potholing crews and fiber splicing technicians
Key Parameters That Affect Results When Drilling for Fiber
Consistent bore quality comes down to controlling a short list of variables - tightly, on every single shot.
| Parameter | Why It Matters | Impact on Results |
|---|---|---|
| Ground/formation type | Dictates bit type, drilling speed, and fluid mix | A poor match causes excessive tool wear, slow progress, or bore path drift |
| Drill bit and reamer selection | Purpose-built tooling reduces chatter and torque swings | A centralized taper-and-spiral reamer improves hole symmetry, speeds the ream-to-finish process, and protects diamonds from chipping |
| Drilling fluid volume/mixture | Controls cuttings removal, hole stability, and bit cooling | Wrong volume or mix risks hole collapse or a sharp drop in drilling efficiency |
| Depth and bore path accuracy | Regulatory minimums and utility clearances must hold | Inaccurate steering risks utility strikes, insufficient cover, or costly rework |
Formation type sets the tone for everything else on the job. Soft ground allows hydraulic cutting, while rock demands mechanical cutting and a completely different bit strategy.
Common formation challenges that affect tooling choices include:
- Cobbles and buried debris that can deflect the bit unexpectedly
- Mixed strata requiring quick bit-type changes mid-bore
- Soft-to-rock transitions needing different cutting mechanisms
That unpredictability is exactly why bit and reamer selection can't be an afterthought - it needs to match what's actually in the ground, not what worked on the last job.
Depth requirements also vary more than most crews expect. South Carolina's DOT sets a minimum of 36 inches of cover for certain longitudinal utility placements.
Union Pacific, on the other hand, requires fiber crossings to sit 5 feet below the base of rail (Union Pacific Wireline Specifications). There's no single national number - always confirm the governing permit before setting your target depth.
Common Mistakes and Troubleshooting When Installing Fiber With HDD
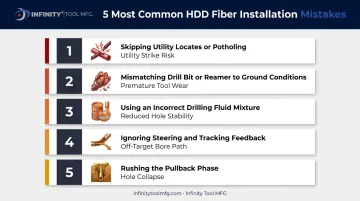
Most HDD failures on fiber jobs trace back to a handful of repeat offenders.
- Skipping thorough utility locates or potholing - This remains the single leading cause of utility strikes on fiber projects. A one-call mark is not verification.
- Mismatching drill bit or reamer to ground conditions - Running a soft-ground bit through rock or gravel causes slow progress and premature wear that eats into your margin. Match the tool to the formation with application-specific PDC or DTH options instead of defaulting to whatever bit is already on the rig.
- Using an incorrect drilling fluid mixture - Wrong volume or composition leads to hole instability, and in bad cases, full bore collapse mid-shot.
- Ignoring steering and tracking feedback - The locator is telling you something in real time. Ignoring it during the pilot bore leads to path deviation or insufficient cover.
- Rushing the pullback phase - Exceeding conduit pulling force limits to save ten minutes risks damaging the fiber cable you just spent hours drilling toward.
Discipline prevents most of these failures. Match your tooling to the formation, and trust the real-time feedback your crew is already getting instead of relying on gut instinct.
Frequently Asked Questions
How deep does fiber optic have to be buried?
Depth requirements vary by jurisdiction and crossing type: some agencies set minimums around 36 inches, while rail and levee crossings can require several feet or more. Always confirm the governing permit or utility code for your specific project.
How long does it take to install fiber using HDD?
HDD can install hundreds of feet per day, depending on rig size, ground conditions, and total bore length. That's typically faster than open-cut trenching, especially in urban areas with restoration requirements.
What ground conditions are hardest for fiber optic HDD projects?
Dense rock, boulder-strewn soils, and unknown buried debris create the biggest challenges. These conditions call for specialized bits and reamers, and often a dual-rod rig for added steering control.
Is HDD more expensive than trenching for fiber installation?
HDD carries higher upfront tooling and equipment costs. However, it often proves cheaper overall once you factor in reduced restoration, faster completion, and less traffic disruption.
Can HDD be used to cross rivers or roads for fiber lines?
Yes. HDD is a preferred method for road, river, and railroad crossings because it avoids disrupting the surface entirely, which is typically required by the permitting agency anyway.
What size drill rig is needed for fiber optic HDD projects?
Rig size depends on bore length and ground type. Compact mini rigs handle short residential shots, while larger dual-rod machines take on long runs or rocky, obstructed ground.